raspi camera로 camera calibration하기
이 게시글은 라즈베리파이 카메라로 캘리브레이션을 하는 내용입니다.
순서는 다음과 같습니다.
- raspicam_node 설치
- camera calibration
- Troubleshooting
1. raspicam_node 설치
ROS로 camera calibration을 하려면 우선 /camera/image 토픽과 /camera 토픽이 필요합니다. 따라서 해당 카메라의 토픽을 실행시킬 수 있는 패키지를 설치해야 합니다.
설치방법은 여기에 나와 있지만 정리해보도록 합시다.
git clone 명령어를 통해 catkin_ws/src 폴더에 패키지를 다운받습니다.
$ cd catkin_ws/src
$ git clone https://github.com/UbiquityRobotics/raspicam_node.git
ROS에 인식되지 않는 의존성 몇 가지를 위해 다음 명령어를 실행해 줍니다.
$ sudo gedit /etc/ros/rosdep/sources.list.d/30-ubiquity.list
열린 30-ubiquity.list 파일에 다음의 구문을 추가하고 저장합니다.
yaml https://raw.githubusercontent.com/UbiquityRobotics/rosdep/master/raspberry-pi.yaml
rosdep update를 실행한 후, 다음의 명령어를 실행합니다.
$ cd ~/catkin_ws
$ rosdep install --from-paths src --ignore-src --rosdistro=kinetic -y
$ catkin_make
설치가 끝났습니다.
다음의 명령어를 통해 카메라가 잘 작동하는지 봅시다. 라즈베리파이에서 실행합니다.
$ roslaunch raspicam_node camerav2_1280x960.launch
rqt_image_view를 실행하여 토픽을 통하여 전송되고 있는 이미지를 볼 수 있습니다.
2. camera calibration
카메라 캘리브레이션을 위해 카메라 노드들을 roslaunch 명령어로 실행합니다. 하지만 그냥 실행하면 image 토픽이 없으므로, enable_raw:=true를 추가해서 image 토픽을 생성합니다.
roslaunch raspicam_node camerav2_1280x960_10fps.launch enable_raw:=true
생성된 토픽은 다음과 같습니다.
$ rostopic list
/diagnostics
/raspicam_node/camera_info
/raspicam_node/image
/raspicam_node/image/compressed
/raspicam_node/parameter_descriptions
/raspicam_node/parameter_updates
/rosout
/rosout_agg
캘리브레이션을 할 때 필요한 노드는 /raspicam_node/image입니다. 그리고 다음의 명령어를 실행하여 캘리브레이션 프로그램을 띄웁니다.
rosrun camera_calibration cameracalibrator.py --size 8x6 --square 0.074 image:=/raspicam_node/image camera:=/raspicam_node
공식 가이드에는 위의 방법이 적혀 있었지만, 저는 이 명령어를 실행하자 오류가 떴습니다.
$ rosrun camera_calibration cameracalibrator.py --size 8x6 --square 0.050mage:=/raspicam_node/image camera:=/raspicam_node
Waiting for service /raspicam_node/set_camera_info ...
OK

(display:27228): GLib-GObject-CRITICAL **: 21:23:37.945: g_object_unref: assertion 'G_IS_OBJECT (object)' failed
Exception in thread Thread-5:
Traceback (most recent call last):
  File "/usr/lib/python2.7/threading.py", line 801, in __bootstrap_inner
    self.run()
  File "/opt/ros/melodic/lib/python2.7/dist-packages/camera_calibration/camera_calibrator.py", line 108, in run
    self.function(m)
  File "/opt/ros/melodic/lib/python2.7/dist-packages/camera_calibration/camera_calibrator.py", line 189, in handle_monocular
    drawable = self.c.handle_msg(msg)
  File "/opt/ros/melodic/lib/python2.7/dist-packages/camera_calibration/calibrator.py", line 811, in handle_msg
    gray = self.mkgray(msg)
  File "/opt/ros/melodic/lib/python2.7/dist-packages/camera_calibration/calibrator.py", line 295, in mkgray
    return self.br.imgmsg_to_cv2(msg, "mono8")
  File "/opt/ros/melodic/lib/python2.7/dist-packages/cv_bridge/core.py", line 171, in imgmsg_to_cv2
    dtype=dtype, buffer=img_msg.data)
TypeError: buffer is too small for requested array


(display:27228): GLib-GObject-CRITICAL **: 21:23:47.126: g_object_unref: assertion 'G_IS_OBJECT (object)' failed
이 오류는 image 토픽이 전송하는 이미지의 크기가 buffer보다 클 때 발생하는 오류입니다.
3. Troubleshooting
구글링 결과, 해결법을 찾아냈습니다. image_transport 패키지의 republish 노드를 이용하여 이미지의 크기를 조절하는 것입니다.
다음의 명령어를 실행하여 image 크기를 조절합니다.
rosrun image_transport republish compressed in:=/raspicam_node/image raw out:=/raspicam_node/image_repub
/raspicam_node/image 토픽의 이미지 크기를 조절하여 /raspicam_node/image_repub 토픽으로 출력합니다. 이 토픽을 카메라 캘리브레이션 할 때 사용합니다.
rosrun camera_calibration cameracalibrator.py --size 8x6 --square 0.050mage:=/raspicam_node/image_repub camera:=/raspicam_node
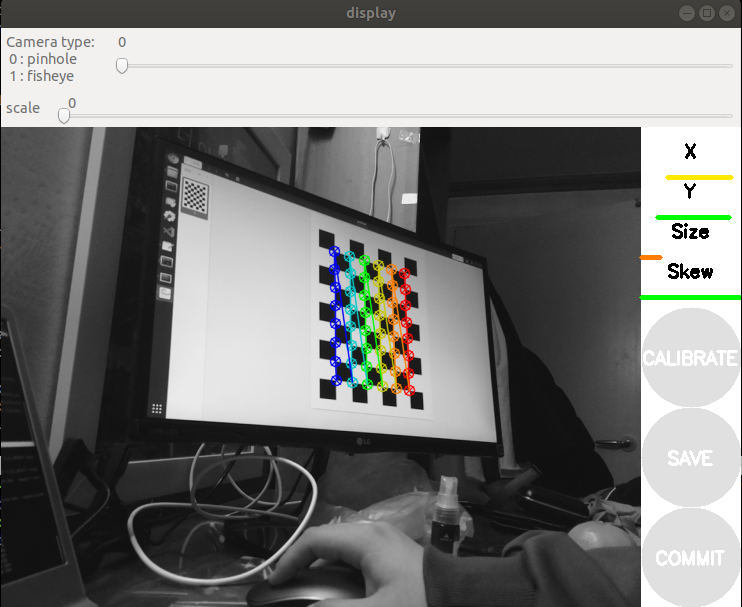
아래는 calibration 사진입니다. 여러 각도의 사진을 분석하여 내부 파라미터값을 찾습니다.

성공!
당장은 모니터에 띄운 사진으로 인식 확인만 했지만, 조만간 A4용지에 복사하여 제대로 calibration 예정입니다.
참고 사이트
UbiquityRobotics/raspicam_node Github
ROS wiki - camera_calibration
How to calibrate raspicam v2.1
Refstop
Deep Learning 및 SLAM을 공부하고 있습니다.


Comments